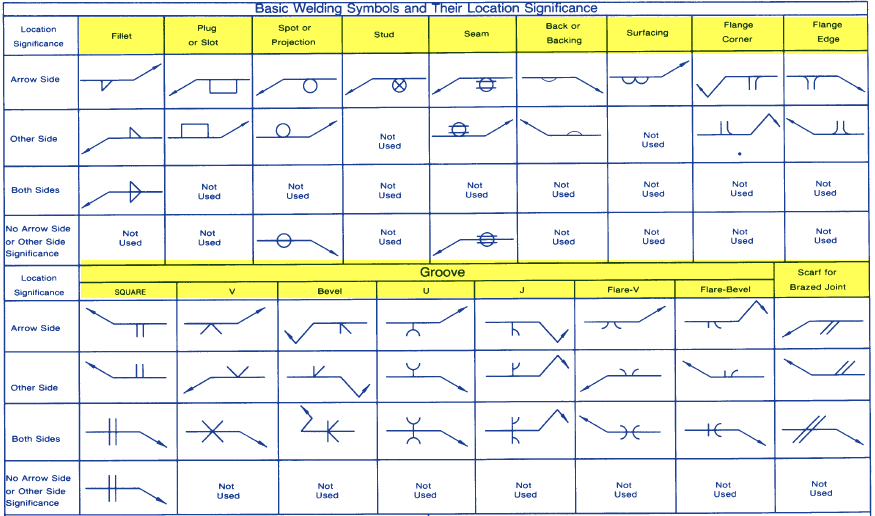
Understanding the basic welding symbols can do wonders for your welds. They interconnect the designer with the welder. Any blueprint heavily peppers with welding symbols, and it’s vital to decipher them. Engineering and fabrication drawings may exhibit cryptic sets of symbols. These symbols describe the type, size, and any other information about the weld.
Understanding welding symbols is not as hard it seems. As long as you understand these common welding symbols, you are good to go!
Elements of a Welding Symbol
Before getting deep into the different types of weld symbols, there are various elements that you need to be conversant with;
Arrow
The arrow is the fundamental element of a welding symbol. It’s an essential part of the welding symbol and points to the joint to be welded. The side to which the arrow points on the joint is defined as the “arrow side,” while the opposite is referred to as the “other side.”
Reference Line
In a welding symbol, the horizontal line that’s connected to the arrow is referred to as the horizontal line. The “arrow side” information of a joint is placed below the reference line while the “other side” is placed above the reference line.
Tail
The tail is drawn at the end of a reference line but opposite the arrow. It can either be drawn with a greater than (>) or less than (<) symbol.
Understanding these elements is vital to understanding different the welding symbols below;
Groove Welds
You will likely come across groove welds more than any other welding symbol. Groove weld symbols are used to connect materials placed next to each other. The edge shape of material pieces to be joined differentiates groove welds.
There are different types of groove welds;
Bevel Groove weld
This groove weld joins pieces of material with rounded or slanted edges with those that have flat edges. In this symbol, an arrow pointing to the piece of material with an angled end should be present. Numbers can be used to specify the degree of angle on the beveled edge.
V-Groove Weld
In this symbol, both material edges are bevel or slant, thus forming a V-shape. Numbers along the symbol indicates the degree of opening when materials are placed side-by-side.
Square Groove Weld
This symbol is used to indicate the joining of materials with perpendicular or straight edges. One or two arrows may point to the weld site, with numbers indicating the width of the spacing needed for the weld.
J and U Groove Weld
A J-groove is used when one of the materials has a square end with the other having a concave end. On the other end, a U-groove is used when both materials have concave ends. Numbers indicate the degree of separation and depth of groove opening. Additional numbers in the parentheses indicate penetration depth in both weld symbols.
Fillet Weld
Fillets welds are used in the creation of lap, corner, and T joints. A fillet symbol features a triangular cross-section placed on the reference line. This indicates the position where the weld material will be placed and welded. The weld size is written to the left of the symbol, regardless of where the weld should be completed.
Fillet welds are often specified as intermittent welds. This means that they are not continuous welds.
Plug and Slot Welds
These welds are used to indicate welds with overlapping materials. Material pieces have round holes for plug welds and long and narrow holes for slot welds.
On the left of the symbol are numbers designating the width of the slot. Numbers indicating the length and pitch of the slot appear on the right, separated by a dash.
For plug weld symbols, the diameter size of the hole is listed on the left side while spacing or pitch specifications are listed to the right. For both welds, arrows indicate the position of bonding.
The Bottom Line
These are the most common weld symbols that you should understand. Being conversant with these symbols is vital for professional welding. For more help on welding, contact us, and we will be willing to help. Read our blog for more tips!
{{cta(‘1615cd3c-4bbe-4d95-8408-39a73e91a111′,’justifycenter’)}}
Discover more from Blackstone Advanced Technologies, LLC
Subscribe to get the latest posts sent to your email.